Introduction to events
Events are actions or occurrences that happen in the system you are programming, which the system tells you about so you can respond to them in some way if desired. For example, if the user clicks a button on a webpage, you might want to respond to that action.
<button onclick="alert('Event handler!');">Press me</button>
Even in a single file, inline event handlers are not a good idea. One button is OK, but what if you had 100 buttons? You'd have to add 100 attributes to the file; it would quickly turn into a maintenance nightmare. With JavaScript, you could easily add an event handler function to all the buttons on the page.
const buttons = document.querySelectorAll("button");

for (let i = 0; i < buttons.length; i++) {
  buttons[i].onclick = bgChange;
}
addEventListener() and removeEventListener()
We specify two parameters — the name of the event we want to register this handler for, and the code that comprises the handler function we want to run in response to it.
const btn = document.querySelector("button");

function anyFunction() {}

btn.addEventListener("click", anyFunction);
btn.removeEventListener("click", anyFunction);
Preventing default behavior
Sometimes, you'll come across a situation where you want to prevent an event from doing what it does by default. The most common example is that of a web form, for example, a custom registration form. When you fill in the details and select the submit button, the natural behavior is for the data to be submitted to a specified page on the server for processing, and the browser to be redirected to a "success message" page of some kind (or the same page, if another is not specified.)
The trouble comes when the user has not submitted the data correctly — as a developer, you want to prevent the submission to the server and give an error message saying what's wrong and what needs to be done to put things right.
HTML
<form>
  <div>
    <label for="fname">First name: </label>
    <input id="fname" type="text" />
  </div>
  <div>
    <label for="lname">Last name: </label>
    <input id="lname" type="text" />
  </div>
  <div>
    <input id="submit" type="submit" />
  </div>
</form>
<p></p>
JS
const form = document.querySelector("form");
const fname = document.getElementById("fname");
const lname = document.getElementById("lname");
const para = document.querySelector("p");

form.onsubmit = function (e) {
  if (fname.value === "" || lname.value === "") {
    e.preventDefault();
    para.textContent = "You need to fill in both names!";
  }
};
Event bubbling and capture
The final subject to cover here is something that you won't come across often, but it can be a real pain if you don't understand it. Event bubbling and capture are two mechanisms that describe what happens when two handlers of the same event type are activated on one element.
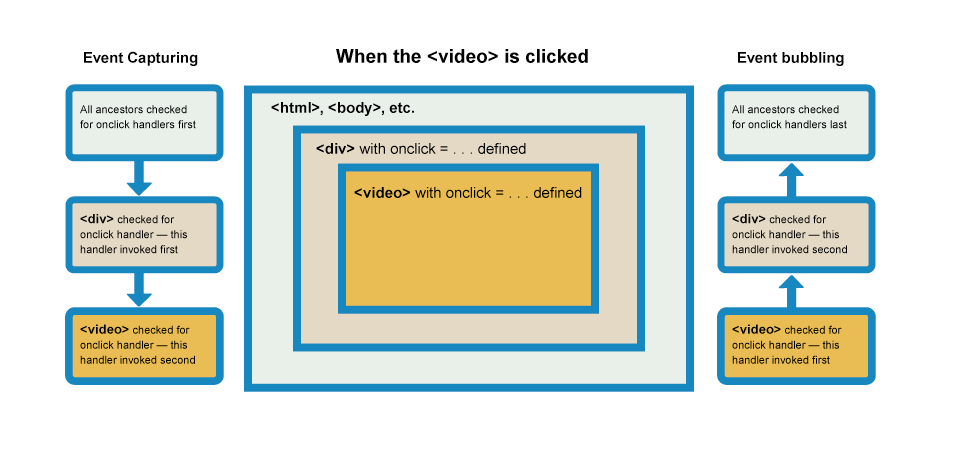
In the capturing phase:
- The browser checks to see if the element's outer-most ancestor html tag has an onclick event handler registered on it for the capturing phase, and runs it if so.
- Then it moves on to the next element inside html tag and does the same thing, then the next one, and so on until it reaches the element that was actually selected.
In the bubbling phase, the exact opposite occurs:
- The browser checks to see if the element selected has an onclick event handler registered on it for the bubbling phase, and runs it if so.
- Then it moves on to the next immediate ancestor element and does the same thing, then the next one, and so on until it reaches the html tag element.
Fixing the problem with stopPropagation()
This is a very annoying behavior, but there is a way to fix it! The standard Event object has a function available on it called stopPropagation() which, when invoked on a handler's event object, makes it so that first handler is run but the event doesn't bubble any further up the chain, so no more handlers will be run.
video.onclick = function (e) {
  e.stopPropagation();
  video.play();
};
Event delegation
The concept relies on the fact that if you want some code to run when you select any one of a large number of child elements, you can set the event listener on their parent and have events that happen on them bubble up to their parent rather than having to set the event listener on every child individually.
Example
Let me explain the how event delegation works and provide pure JavaScript example of basic event delegation.
<ul id="parent-list">
  <li id="post-1">Item 1</li>
  <li id="post-2">Item 2</li>
  <li id="post-3">Item 3</li>
  <li id="post-4">Item 4</li>
  <li id="post-5">Item 5</li>
  <li id="post-6">Item 6</li>
</ul>
Adding and removing event listeners would be a nightmare, especially if addition and removal code is in different places within your app. The better solution is to add an event listener to the parent UL element. But if you add the event listener to the parent, how will you know which element was clicked?
Simple: when the event bubbles up to the UL element, you check the event object's target property to gain a reference to the actual clicked node. Here's a very basic JavaScript snippet which illustrates event delegation:
document.getElementById("parent-list").addEventListener("click", function (e) {
  // e.target is the clicked element!
  // If it was a list item
  if (e.target && e.target.nodeName == "LI") {
    // List item found!  Output the ID!
    console.log(
      "List item ",
      e.target.id.replace("post-", ""),
      " was clicked!"
    );
  }
});
Resources
https://developer.mozilla.org/en-US/docs/Learn/JavaScript/Building_blocks/Events